
AFTER YOUR BM INVITATION
Joined your Business Manager?
Set up your Page and assets.
Follow these three steps after accepting your Facebook Business Manager invitation: create a Page, create a business asset group, then assign the people and ad accounts you need.
Check your setup before advertising. These steps organize your assets and permissions. Creating a Page or an asset group does not remove restrictions or guarantee ad approval.
YOUR FACEBOOK PAGE
Create a new Page
Menu pathSettings → Accounts → Pages → Add
- In the left menu, expand Accounts and select Pages.
- Click Add at the top right, then choose Create a new Facebook Page, as shown below.
- Follow Meta’s form. Use the name of the business or brand you represent, select a category that fits its activity, and complete the requested details.
- Once created, select the Page and check who can access it.
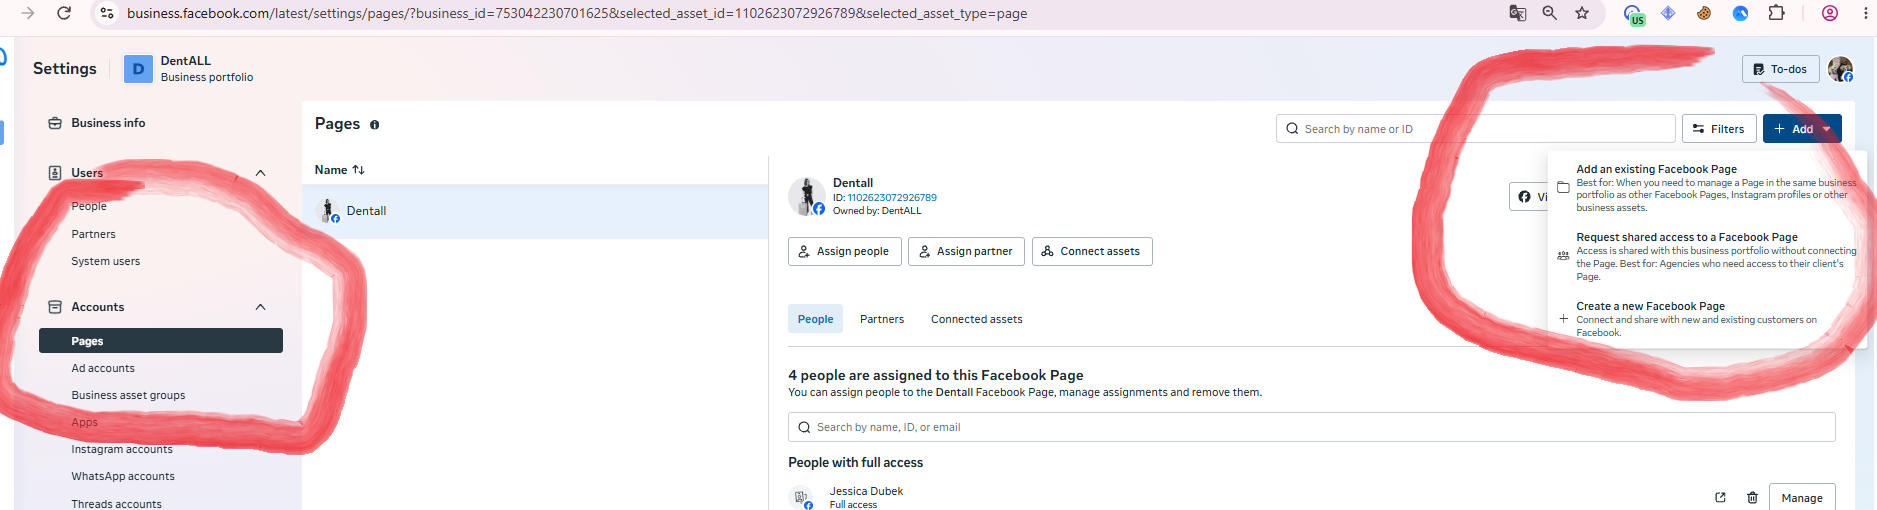
Already have the right Page? Use the appropriate option to add it or request access instead of creating an unnecessary duplicate. Only work with a Page you are authorized to manage.
ORGANIZE YOUR WORKSPACE
Create a business asset group
Menu pathSettings → Accounts → Business asset groups → Add
A business asset group brings related assets together so you can manage their access as a group. For example, use one group for a brand or a regional team.
- Under Accounts, select Business asset groups.
- Click Add, then Create a business asset group.
- Follow the creation flow and enter a descriptive group name. If Meta asks you to choose assets and people during creation, complete those choices using the checks in step 3.
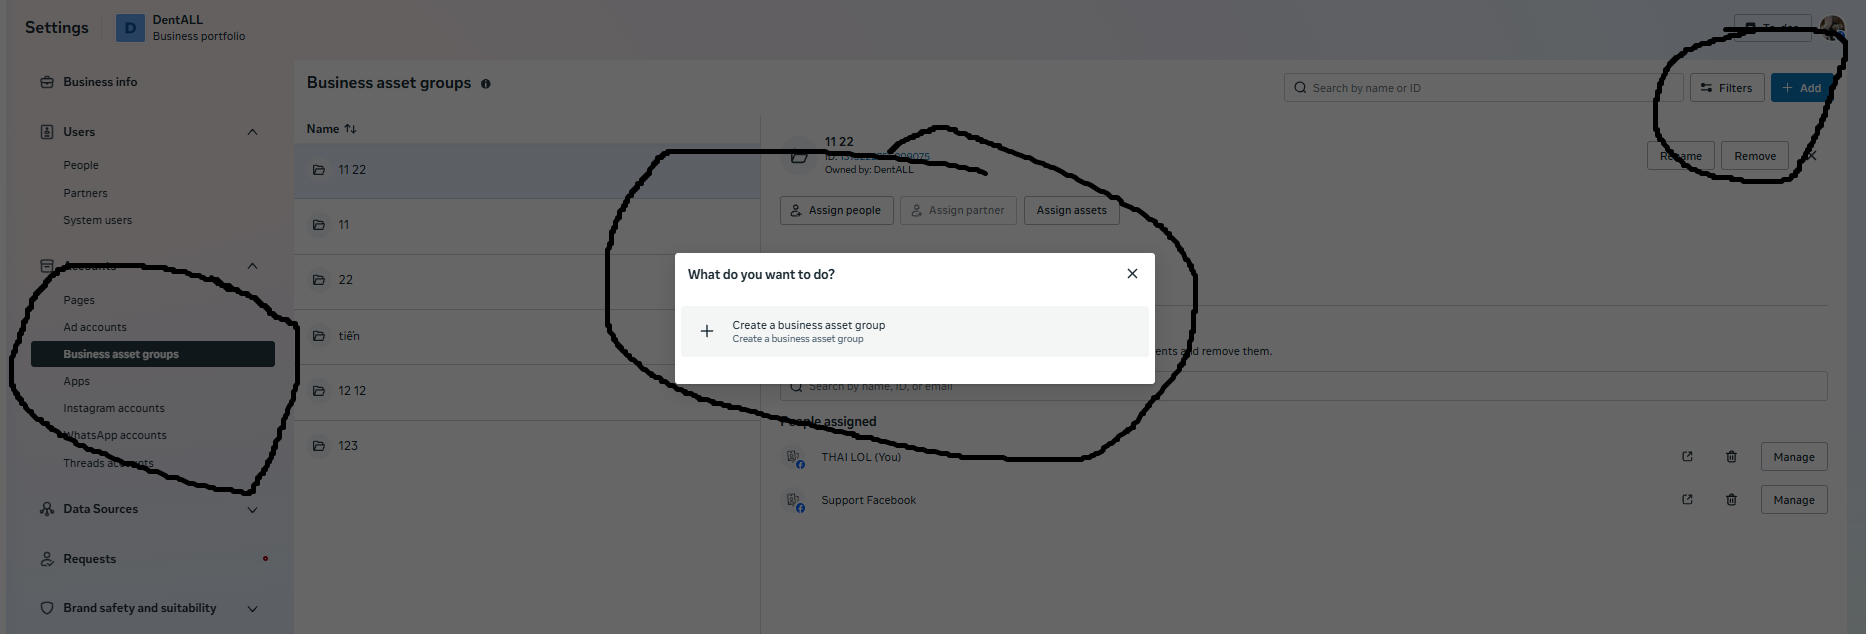
The group organizes existing access. It does not verify the business, create an ad account or increase your BM’s ad account capacity.
NAME · PEOPLE · AD ACCOUNTS
Name the group and assign people and assets
Select your group in the left-hand list. The example below shows the controls for an existing group; your creation flow may ask for assets before people.
Give the group a useful name
Use a name such as Your Brand — UK or Your Brand — Marketing. If needed, click Rename to change the name entered during creation.
Add the people who need access
Click Assign people. Select the appropriate people and review the permissions you grant. Give each person the access their role requires. If someone is missing, check their accepted invitation and portfolio access under Users → People.
Add the Page and advertising accounts
Click Assign assets. Select the Page and the ad accounts available to this portfolio that belong in this group, then save your choices. Adding an asset here groups an existing asset; it does not create a new advertising account.
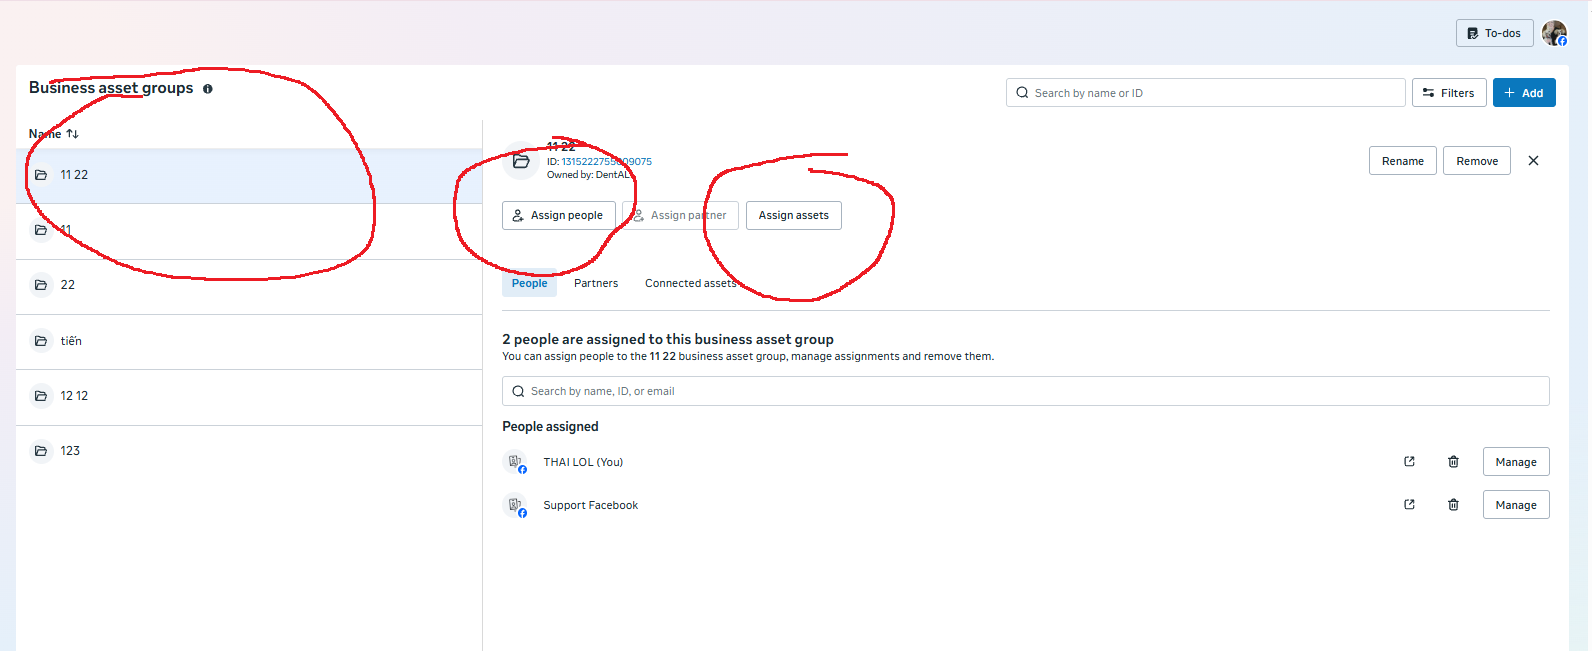
Check the result: the correct people should appear in People, and the intended Page and ad accounts in Connected assets. Review the actual permissions, not just the names in the list.
BEFORE YOUR FIRST CAMPAIGN
Check security and account status
- Secure your login. Enable two-factor authentication, review login alerts and keep passwords and recovery codes private. Meta’s account-security guidance explains these protections.
- Review people and permissions. Confirm that the team has the access it needs and ask the portfolio administrator about any unfamiliar assignment. Meta Blueprint’s portfolio course covers accounts, permissions and security.
- Check any restriction before advertising. Open Meta Business Support Home and follow any actions or review options shown for the affected account. A new Page or asset group is not a fix for an existing restriction.
- Check the campaign and billing setup. Review the Page, ad account, payment method, ad content and destination before publishing. Consult Meta’s Advertising Standards for the current rules that apply to your ads.
If something looks different
I cannot see Add or Assign assets.
First check that you selected the intended portfolio. Ask its administrator to confirm your permissions and the asset’s availability. Menu labels and features can vary between Meta interfaces. If an account restriction is shown, use the actions in Business Support Home.
No advertising account appears in the list.
Check Accounts → Ad accounts and confirm which accounts were included in your order or shared with the portfolio. A BM0 is a container without an included ad account. Creating an asset group will not supply an account that is missing from the portfolio.
Do I have to copy the names in the screenshots?
No. The portfolio, Page, group and people shown are examples. Use names that describe your own business and assign only the people and assets you are authorized to manage.
Will these steps prevent my BM from being banned?
No. This tutorial organizes assets and helps you check access. It does not override Meta’s rules, remove an existing restriction or guarantee that an account or ad will be approved.
The three screenshots were supplied by BM Provider for this guide. They illustrate the interface; they are not a record of your account or a promise about its status. Menu labels may change.
Related: BM0–BM5 features and access · Contact and delivery · Replacement policy